| Goal |
On the back of the steering wheel there is a plastic cover, or cowl.
We need to cut two holes into the cowl to accommodate the cruise control
switch.
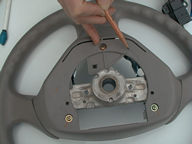
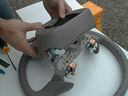
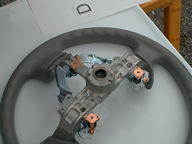
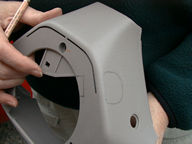
Look carefully at the images of the stock Toyota cruise control steering
wheel (courtesy of Alex Karahalios), side
and back,
as a reference for what the factory holes look like. These holes are what
you're paying for if you buy the Toyota factory part. We estimate they
are $240 apiece. ($600 cruise control steering wheel - $120 cruise control
switch / 2)
|
| Step 1 |
| Place steering wheel upside-down on a work table. Compare your steering
wheel to the stock wheel images, looking at it from the same angle.
Note the two cutouts that you'll have to make: One is on the the back
of the cowl and allows the body of the cruise control switch to fit
flush against the inside of the cowl. The other is a hole in roughly
the shape of a "D" to accommodate the stalk of the cruise
control switch as it protrudes out the side of the cowl. |
|
|
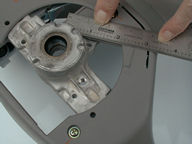
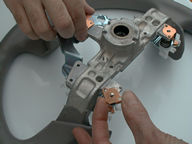
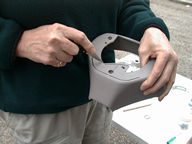
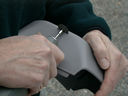
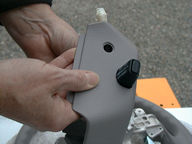
| Step 2 |
| Notice where the cruise control switch will go. Inside the cowl
there is a flat plastic plate. The straight edge of that plate leads
out to the edge of the cowl and is your reference line. It will fit
snug up against the side of the cruise control switch body. If you
extend that edge over and around the outside of the cowl, it will
border one side of the D shaped hole. Look at the images to see how
we lined it up with a ruler |
|
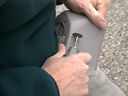
Mark the rectangular cutout that will allow for the cruise control switch
body. The reference line above should be extended 1cm into the cowl, then
perpendicular for 2cm, and finally back out the cowl. Refer to the photo
for dimensions. This was our first, conservative outline, based on tracing
the body of the switch held in approximate place.
Note where the D shaped hole will go to allow the switch to stick out.
Remember that you are working with the steering wheel upside-down.
|
| Step 3 |
| Remove the three screws holding the cowl on. They are surprisingly
loose. Then gently, lift the cowl off. |
|
|
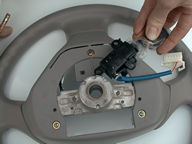
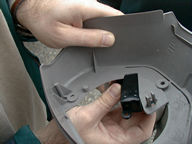
| Step 4 |
| Remove the three horn contacts from the steering wheel. They just
lift off. Note carefully their orientation and where they went: Two
are alike, and one is different. Set them aside in the small parts
container. |
|
|
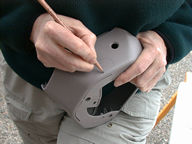
| Step 5 |
|
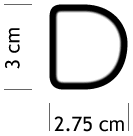
Prepare the D shaped template. You can print out the image at right,
and then cut it out. Be aware that your software may not print the
image at the same scale as we drew it, so check to make sure it
is the right size. You can always just draw one one a piece of paper
from our dimensions.
Tape the template in place. Trace around it in pencil, and then
remove it.
|
 |
|
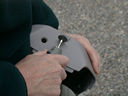
| Step 6 |
Using a knife, cut away the rectangular area for the switch body on the
back of the cowl. Use the switch to check your work that the cutout is big
enough: The larger part of the switch body should fit nicely into the notch
you're cutting. You could also use a Dremel tool with a rotary file attachment,
but we found the knife produced more distinct corners.
|
| Step 7 |
Cut out the center of the D shaped hole. Better to err on the small side!
As illustrated, we used a Dremel tool with a cut-off wheel, but you could
just as easily drill it out. The plan is to make a hole big enough so we
can get the Dremel rotary file into it and easily manipulate the tool..
|
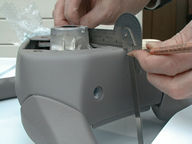
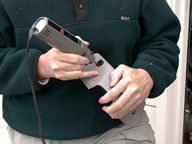
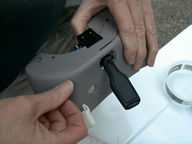
| Step 8 |
|
Finally, using the Dremel with the rotary file attached, shape
the D hole. Note how we held the cowl and tool in the photo. Keep
the tool perpendicular to the cowl. Take off small amounts with
each pass. Take your time, don't rush it.
The plastic will heat up enough to melt and splatter. The splatter
will mar the surface of the cowl, but you can scratch it off carefully
with your finger nail without any damage to the cowl's plastic surface.
|
|
|
| Step 9 |
Use the switch to make sure that it passes through the D hole easily.
Make sure you have the orientation of the switch correct: The printed
words face the open side of the cowl.
|
| Done |
The two big cuts have been made in the cowl: one for the paddle and one
to seat the switch body. |


