| 2001 Prius Cruise Control |
|
|||
|
 |
||||||||||||
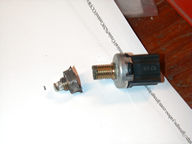
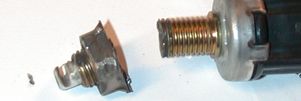
| Goal |
Replace the brake light switch with the new brake light/cruise control cancel switch. |
||||
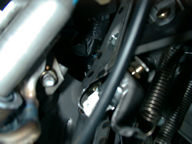
| What? |
The switch is mounted in a bracket made of bent sheet metal. The switch has a threaded shaft that goes through a hole in the bracket with a nut on either side to lock the switch in place. One nut is plainly visible when you are on your back looking up under the dash. It is the nut closer to the plunger end of the switch. The other nut is out of sight, on the other side of the bracket. You might think you'd just get a wrench on the nut and loosen it... But no! The nut that you can easily see is welded to the bracket! The other nut, the one that can be loosened, is on the other side of the bracket, away from you, out of sight, with almost no working room at all! Bummer! There are three things you can do at this point: |
||||
| Option 1 |
Take the car to your Toyota dealer and ask them to replace the switch. This seemed expensive, so we didn't do it. |
||||
| Option 2 |
Buy a 14mm "crowfoot" wrench; or, bend an offset into and shorten - cut off - a 14mm open end wrench; or, bend an offset into, shorten and cut a notch in box end the width of the brake light switch shaft into a 14mm box end wrench. While you're out, buy some Kevlar gloves to protect your hands from sheet metal cuts. OK,OK you can tell we don't really like any of these ideas - why? Two reasons: 1) pain and strain; and, 2) the average person can't fabricate these things! We originally dismissed this option. Then people wrote us to tell us about it. Most took at least a half-hour to remove the switch. Many cursed and bled. At least one person couldn't get the nut to loosen because the alignment of the nut and the clearances just didn't work. Several people did it complete it successfully. If you're going to go this route anyway, here's how you proceed: First, disconnect the plug from the back of the existing switch. There is a little release tab on the plug to press, and then pull the plug. Do not pull on the wires. Second, note how far the threaded shaft of the switch protrudes from the welded on nut. Note also the clearance it has from the brake pedal when the brake pedal is at rest. You will need to duplicate this alignment with the new switch. Now, with the short wrench, you should be able to reach up around the back side of the sheet metal and get the wrench on the nut on that side. You will have very little clearance and won't be able to turn it much. But all you need is just a little turn to "unlock" the nut. Then you can unscrew the switch by turning the switch body.. When you have the switch out, remove the nut on the shaft of the old switch and put it the new switch, threading it down to the same position. Install the new switch by reversing the above: Screw in the switch, make sure the alignment of the switch is correct. Tighten the nut that is behind the sheet metal down: fingers first, then with the wrench. Finally, plug in the wire harness to the back of the switch. |
||||
| Option 3 |
This is the option we took, with one small change: WE LET A MECHANIC WITH A SHOP DO IT! We didn't particularly relish lying on our backs, protecting face and clothes from a shower of red hot metal chips, as we ground off the spot-welded nut. We paid a mechanic to do it and considered it money well spent. It took our mechanic about an hour to do the job.
|
||||
| Important |
Adjusting the new brake light switch: Be sure to adjust the new switch (or have it adjusted) so that the brake switch engages (signals the brake lights to come on and the Cruise Control to "Cancel") when you tap the pedal with your foot. The reason is that in the non-Cruise Control vehicle, it's not vital if the brake lights come on after the brake pedal travels, say, a quarter of an inch. But, in the Cruise Control equipped vehicle, the Cruise Control must cancel immediately after your foot sends the signal, however slight, that you want to slow down or stop the car. So, back the threaded shaft out from the lower lock nut so that the brake lights come on as soon as you depress the brake (test using your fingers on the brake pedal... have someone watch the brake lights and make adjustments accordingly). Do this, and the "Cancel" behavior of the cruise Cruise Control will always feel safe and secure. |
| http://www.glyphic.com/ozone/prius/ last updated March 27, 2001 Copyright © 2001, Ozone House All rights reserved. |